How to deploy Gatsby.js website to DigitalOcean using Github actions
Gatsby.js is one of the most interesting frameworks for generating static pages. It is powerful, flexible, has excellent documentation and is growing very fast. It's based on React and actual static sites generation is up to Node.js. It's so popular that there are services like Vercel and Netlify that simplify the hosting and CI / CD of Gatsby based websites. However, sometimes we need to use our own server and host the app ourselves to have more control over the build process.
What we want to achieve
We want to create an automated process that does the following things.
- We have a Github repository with our Gatsby.js website
- Every time we push changes to remote master branch it triggers Github runner
- Github action triggered by Github runner is installing our dependencies and building our Gatsby website on digital ocean droplet
What we need
- Digital Ocean Droplet with configured Nginx
- Gatsby website
- Github account
Preparing server
First of all, let's log into our server (non-root user) using SSH:
ssh <username>@<server_addresss>
Installing Node.js
Install Node.js by running the following commands:
sudo apt-get update
sudo apt-get install node
Install Gatsby CLI
And the most important part, install Gatsby CLI
sudo npm install -g gatsby-cli
Now you'll be able to run gatsby build command which generates static sites but obviously, we want to automate it to run automatically every time we commit our changes to master branch.
Preparing Github Actions
Ok, now when we have Node.js and Gatsby CLI installed, we want to set up our Github actions. Let's log into your Github account and do the following steps:
- Create new repository
- Push your Gatsby website to the master branch
- Go to the settings tab on Github

- From the sidebar, select "Actions" and push the "Add runner" button
 5. Change operating system to Linux
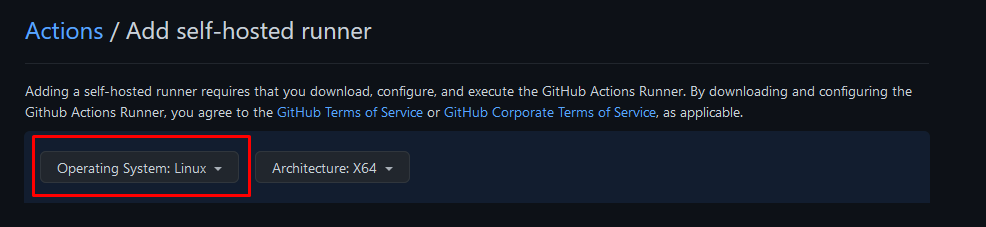
- Next, you have to execute commands provided by Github (you can find them below the operating system selector).
Runner installer will ask you some questions mostly related to how you want to name your runners
- After installing runner you have to run it in the background by running the command:
sudo ./svc.sh install
sudo ./svc.sh start
You can check the status of a runner by running command:
sudo ./svc.sh status
Great! Now you have a runner configured! Let's just create our Github actions file.
- On your Github account, navigate to the "Actions" tab

- Select this option:
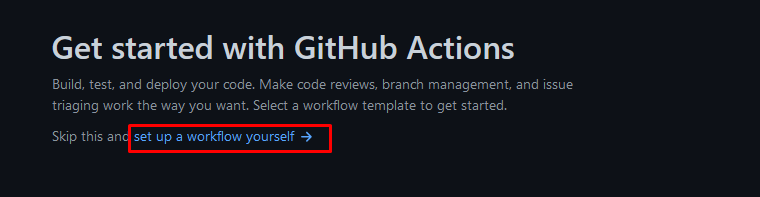
It will open a .yml file editor that is responsible for describing the process of your Github action. It's pre-populated with some default steps. Let's remove it all and paste there the following code:
name: Gatsby.js CI

on:
  push:
    branches: [ master ]

jobs:
  build:

    runs-on: self-hosted

    strategy:
      matrix:
        node-version: [14.x]
        # See supported Node.js release schedule at https://nodejs.org/en/about/releases/

    steps:
    - uses: actions/checkout@v2
    - name: Use Node.js ${{ matrix.node-version }}
      uses: actions/setup-node@v1
      with:
        node-version: ${{ matrix.node-version }}
    - run: npm i
    - run: gatsby build
This file basically describes what kind of steps need to be reproduced on the server when some action happened. Here in this file we have an action that runs every time when we push changes to master. It's described by this snippet:
on:
  push:
    branches: [ master ]
Then we have some information that we want to run it on our own server
runs-on: self-hosted
And some strategy about supported Node.js versions:
strategy:
      matrix:
        node-version: [14.x]
And the most important part: steps!
steps:
    - uses: actions/checkout@v2
    - name: Use Node.js ${{ matrix.node-version }}
      uses: actions/setup-node@v1
      with:
        node-version: ${{ matrix.node-version }}
    - run: npm i
    - run: gatsby build
It tells Github runner to use actions/checkout hook with specified Node.js version, install all depenencies by running npm i and generate static sites by running gatsby build.
Great! Now just push "Start commit" button on the right side of the screen and it will automatically push this config file to your master branch. We can navigate again to the "Actions" tab and check if our first action was triggered.
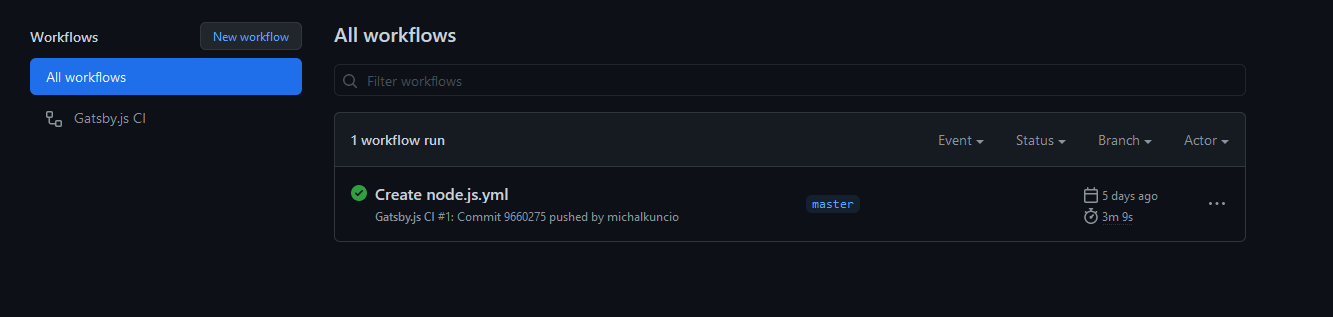
If you can see the green icon next to your action that means that your build has passed without any errors!
So now, every time you push changes to the master branch it will trigger another action and build your static sites.
Adding our website to Nginx
- Finally, we have to add the directory with our website to Nginx config.
cd /etc/nginx/sites-available/
- Open file with your favorite editor (here we are using nano)
sudo nano default
- And add the following code block
server {
  root <path to my-gatsby-app>/public;
  index index.html index.htm index.nginx-debian.html;
  server_name <your-domain-name>;
  location / {
    try_files $uri $uri/ =404;
  }
}
- Restart Nginx
sudo systemctl restart nginx
Final result
We are done! Now you have a fully automated workflow and moreover you have full control over your build steps. Every time you push changes to the remote master branch it takes only a few minutes to see the changes on your live website.