Recreate iPod state machine with XState and Vue 3
Front-end libraries and frameworks such as Vue, React, Angular or Svelte have many features but one of the most important ones is state management. We can manage a component’s local state or handle it more globally with a dedicated state management library like Pinia, Vuex, Redux or Zustand. But sometimes we need to manage a different kind of state - machine specific state.
Let’s imagine some physical machine, for example, a coffee machine. We can think about what states the machine can be in. Let's try to list some of them:
- idle
- heating up
- cleaning
- making coffee
- error state
A machine like this one can be in only one state at the same time. It can't pour coffee while cleaning it. Also, the sequence and the path of states are defined and finite in a way that it is impossible to break certain order. It is impossible to make coffee straight after turning on the device without previous heat up and cleaning. That kind of machine is called a finite state machine.
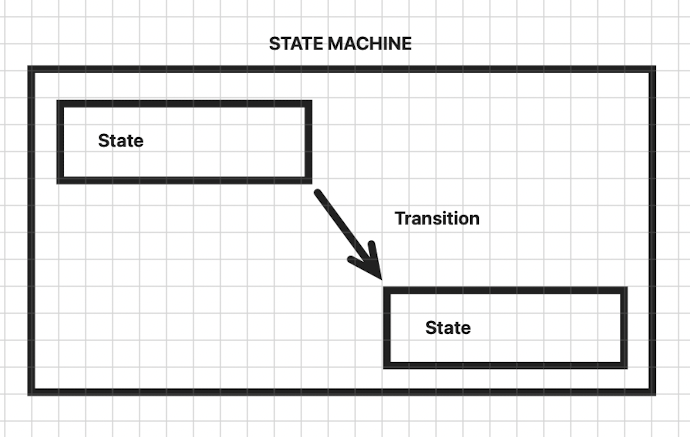
Finite State Machine
A finite State Machine is an abstract machine that can be in exactly one state at the same time. The machine can change its state using transitions. A transition is an act of changing from one state to another.
Problems with implementation
Let's imagine that we want to build a simple UI for any kind of machine. Parking lot machines, vending machines, it doesn't really matter since they are all some form of a finite state machine. The more complicated and the more states a machine has, the more difficult the management of these states becomes. If the machine is in state A and the available transitions from this state are only to states B and D we have to be careful not to move this machine to any of the other forbidden states. If we have 20+ states you can only imagine how difficult it can become to manage and validate the states. This can cause a lot of bugs that are difficult to debug. Instead of doing it all manually, we can leverage the proven solution in the form of a great library - XState.
XState to the rescue
XState is JavaScript and TypeScript library that helps create and manage state machines and state charts. To keep it simple, XState has:
- Great docs
- Large community
- Great Tooling Visual Studio Code extension
- Support for popular frameworks (Vue, React, Svelte)
I guess there is no need to persuade any longer! For more info check the official docs
Since there is no better way to learn a new library than by creating a simple app, we will try to recreate the iPod state machine with the one and only Vue 3!.
Building the app with Vue3 and Xstate
First of all, let's take a look at the app we are about to create:
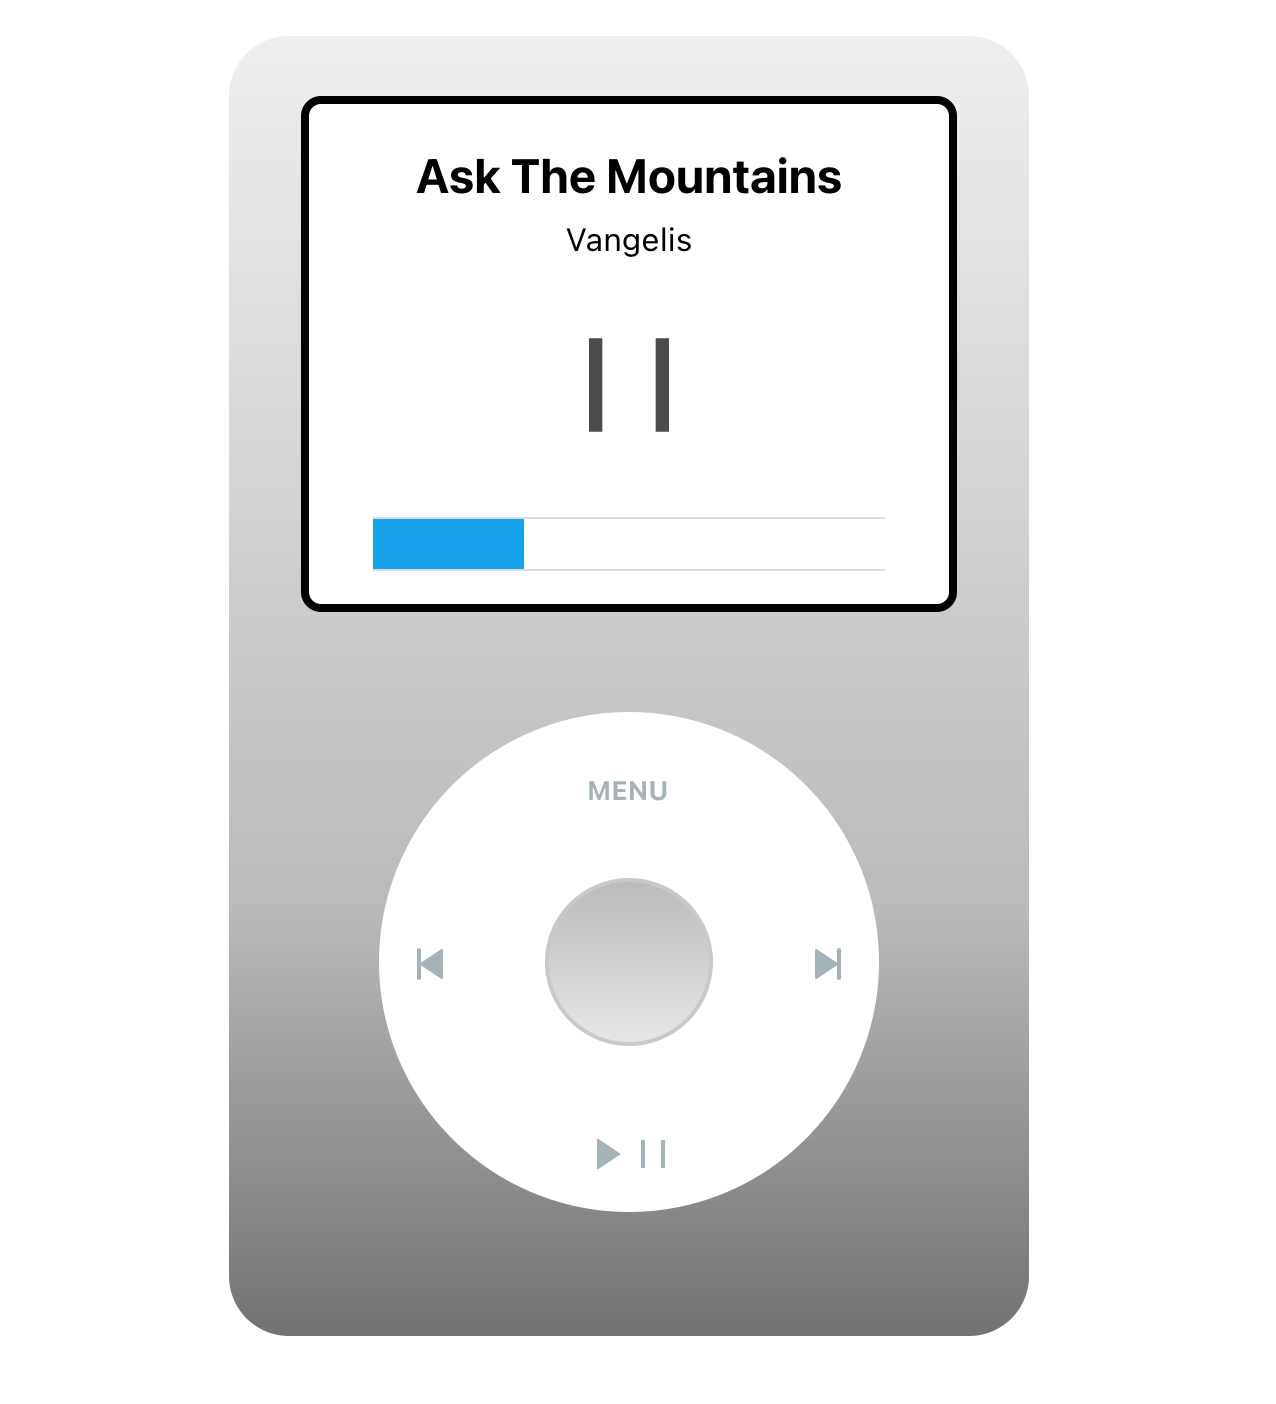
The UI simulates the iPod user interface and the buttons on the wheel are triggering desired actions. For this tutorial, we will omit the CSS part of the app but you can always check out the source code if you are interested.
Ok, let's start building! 💪🏻
We can start by scaffolding the Vue app:
npm install vue@latest
We don't need routing, testing libraries, state management, etc. so you can choose the following options:
Install XState main dependency:
npm install xstate
and since we are using Vue 3 as a framework, we have to install a framework-specific package:
npm install @xstate/vue
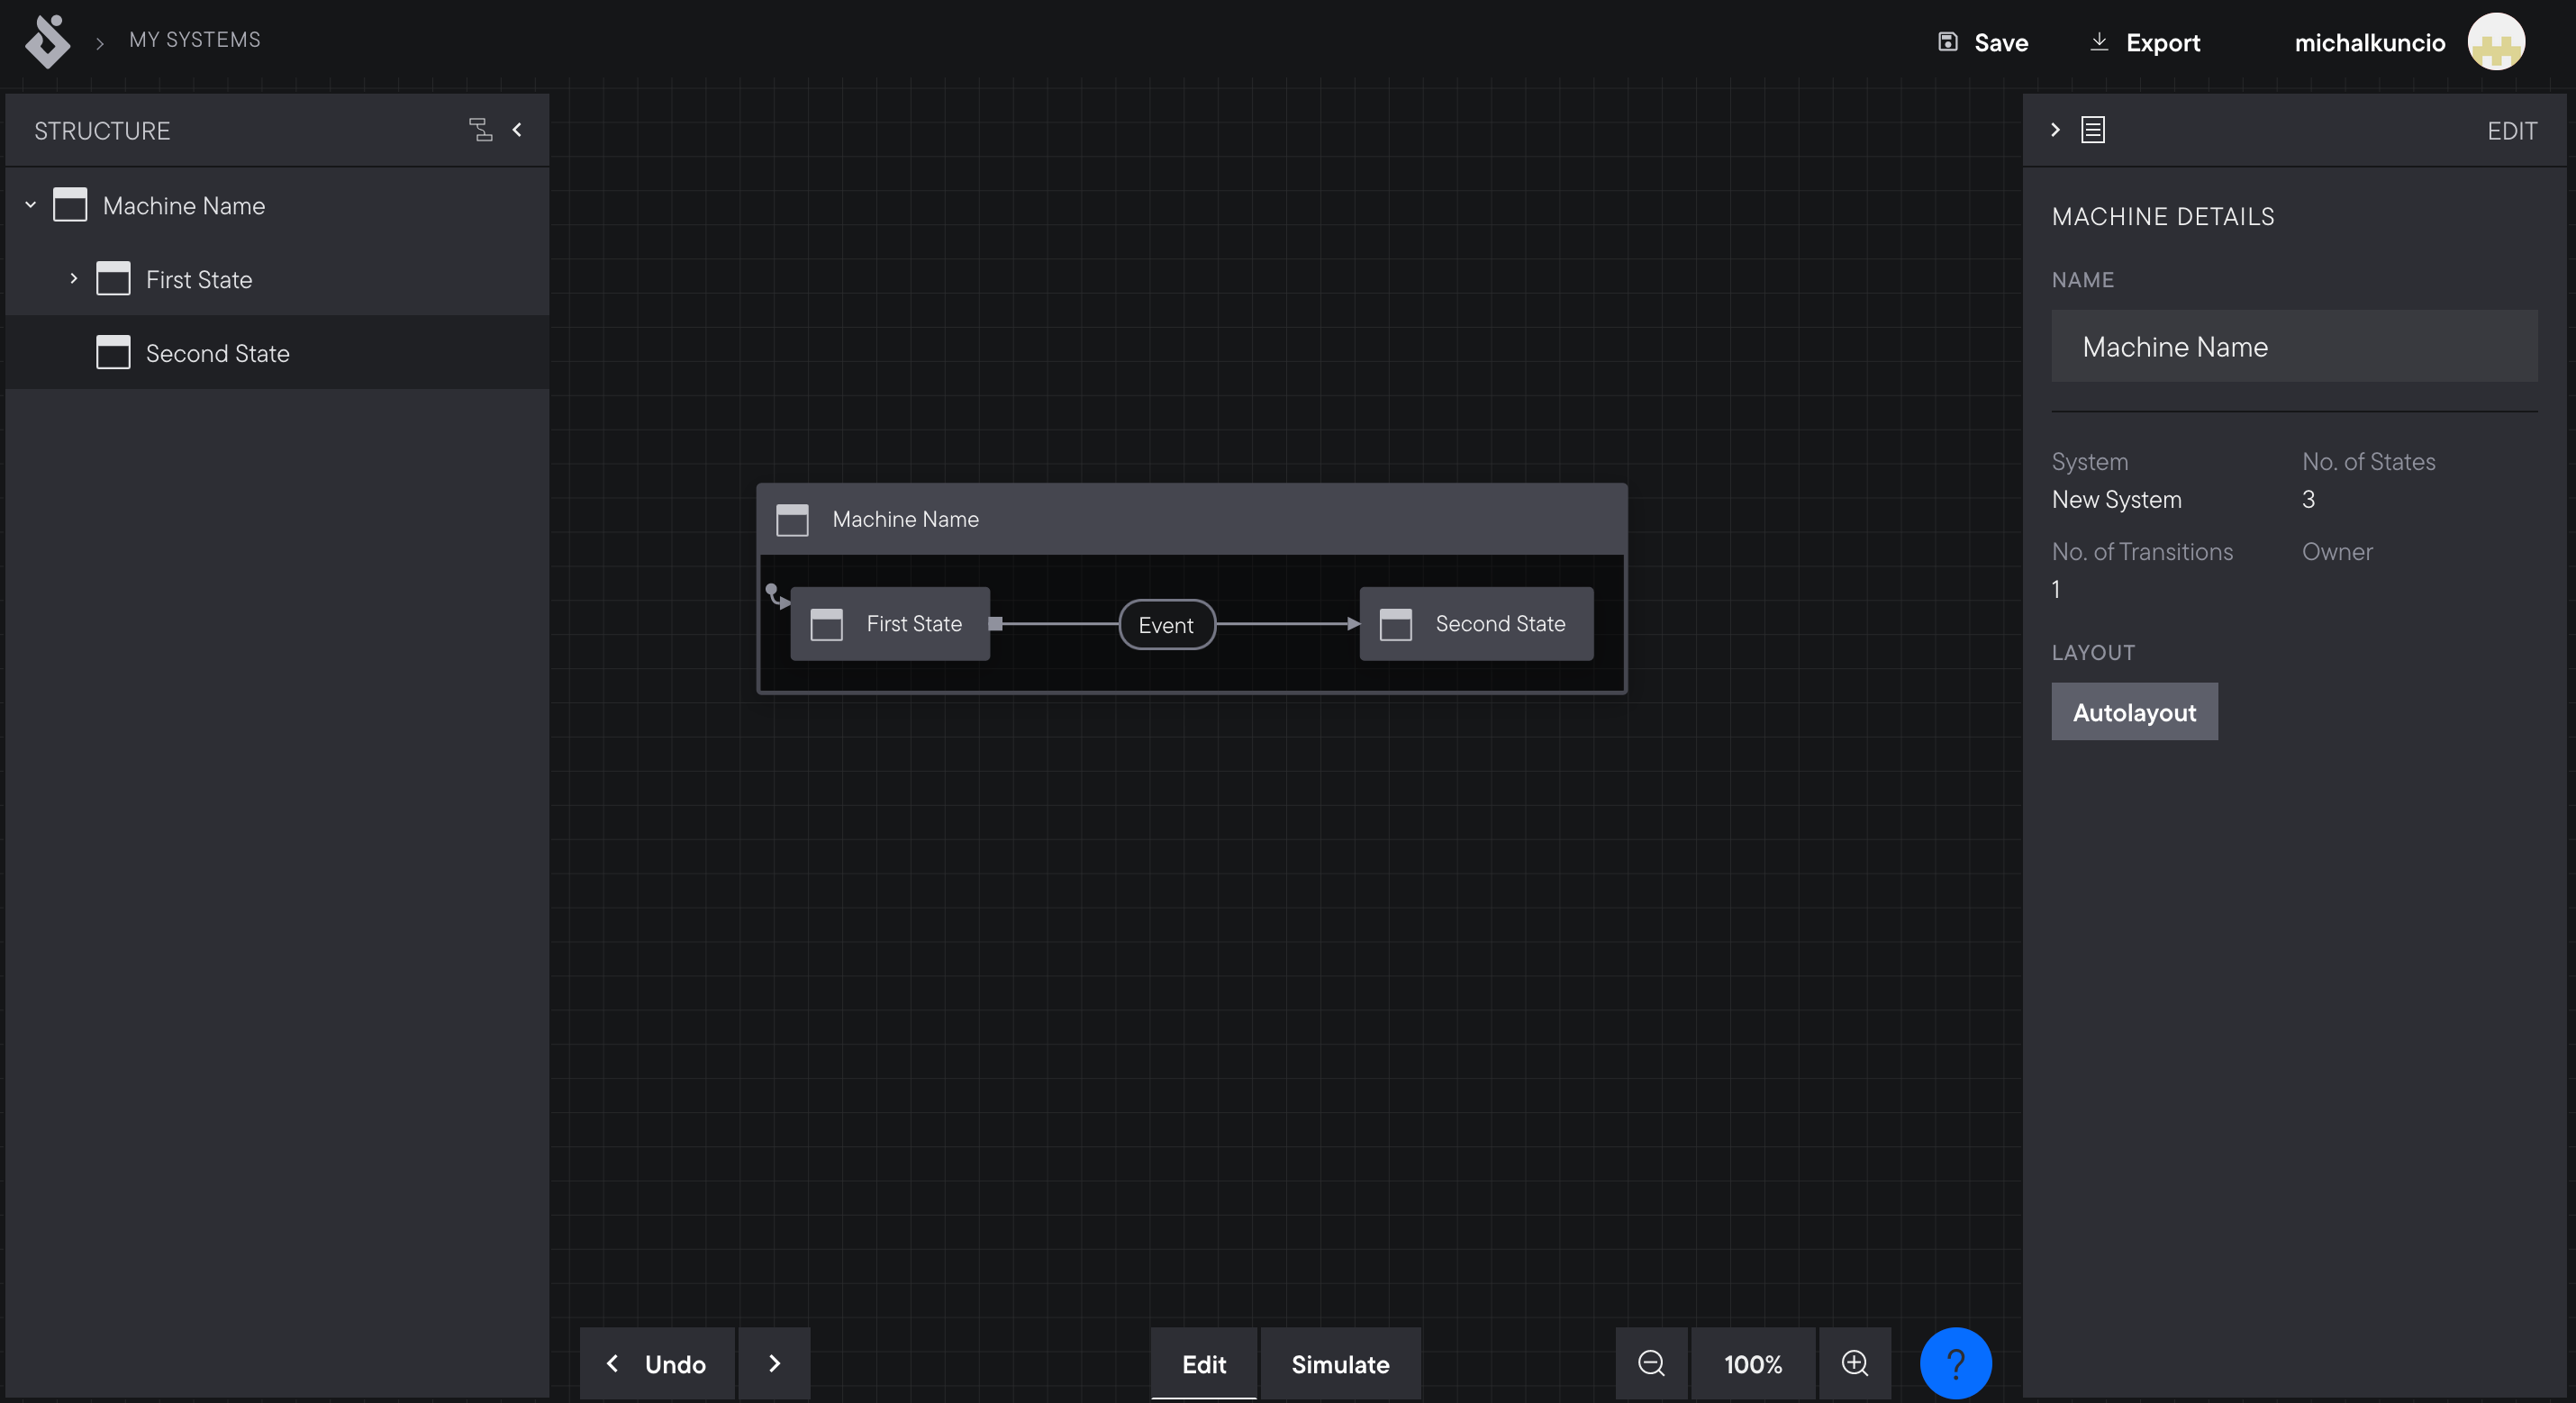
Before we start working on our state machine logic, it's worth mentioning that there is an amazing tool in which we can draw our machine states and generate the machine code without writing it manually! Let's take a look at Stately.
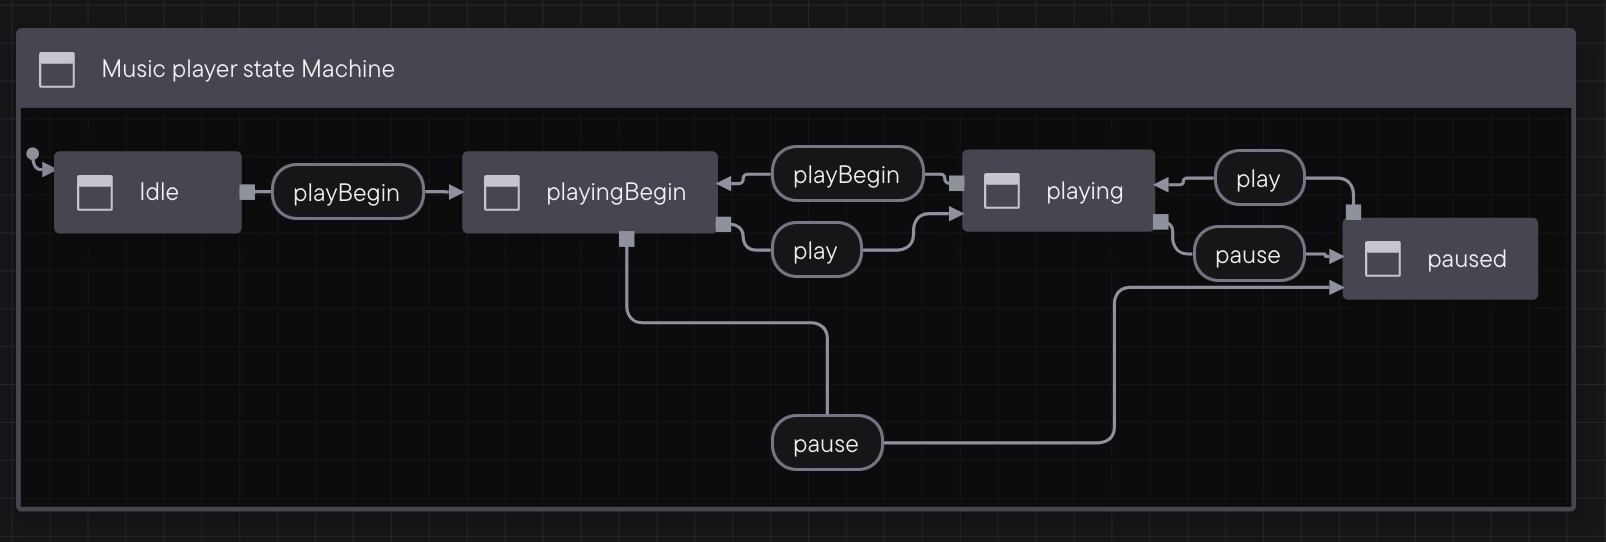
Instead of jumping straight to drawing our diagram, we should brainstorm a bit about iPod's states.
- idle (when we turn on the device)
- playingBegin (playing at the very beginning of the track - the state when hitting the "previous" button will go to the previous track)
- playing (when hitting the "previous button" will rewind to the beginning of the track)
- paused
There are only 4 states but there are some rules about state transitions we have to keep in mind:
- from the idle state, we can only transition to play_begin state. We can't transition straight to the play state because this state has to be followed by play_begin state which is the state present at the beginning of the track. We also can't go straight to pause state for obvious reasons.
- from playingBegin state, we can go to playing or paused state
- from playing state we can go to playingBegin or paused state
- from paused we can go to playing state
Great! Now we can try to create the diagram using Stately:
And next at the top right corner, click "export" to copy the machine JSON file to the clipboard.
The file in our case will look like this:
{
  "id": "playerMachine",
  "initial": "idle",
  "states": {
    "idle": {
      "on": { "PLAY_BEGIN": { "target": "playingBegin" } }
    },
    "playingBegin": {
      "on": {
        "PLAY": { "target": "playing" },
        "PAUSE": { "target": "paused" }
      }
    },
    "playing": {
      "on": {
        "PAUSE": { "target": "paused" },
        "PLAY_BEGIN": { "target": "playingBegin" }
      }
    },
    "paused": {
      "on": {
        "PLAY": { "target": "playing" }
      }
    }
  }
}
We basically have the whole state machine defined right now. The JSON generated by Stately describes all states and available transitions between them. It also defines the initial state. Ok, since we have our states definition ready we can implement it in Vue!
We can start by creating a music player component. Let's create a new file called MusicPlayer.vue inside src/components directory. Next, you can clean up an App.vue file scaffolded by Vue CLI. Let's just register the music player component there:
<script setup lang="ts">
  import MusicPlayer from "./components/MusicPlayer.vue";
</script>

<template>
  <main>
    <MusicPlayer />
  </main>
</template>
We won't need this file again, so we can close it. Next up, let's use the state machine we generated previously. Let's create a new directory called /machines and create a new file playerMachine.ts inside this directory. Now we can use the first function provided by XState. Let's use createMachine function:
import { createMachine } from "xstate";

export const playerMachine = createMachine({
  id: "playerMachine",
  initial: "idle",
  states: {
    idle: {
      on: { PLAY_BEGIN: { target: "playingBegin" } }
    },
    playingBegin: {
      on: {
        PLAY: { target: "playing" },
        PAUSE: { target: "paused" }
      }
    },
    playing: {
      on: {
        PAUSE: { target: "paused" },
        PLAY_BEGIN: { target: "playingBegin" }
      }
    },
    paused: {
      on: {
        PLAY: { target: "playing" }
      }
    }
  }
});
What we have done here is create an instance of our machine called playerMachine using createMachine() function with machine JSON descriptor as an argument. This instance is exported so we can use it in another file. We can now close the file and go back to MusicPlayer.vue file. The rest of our work will happen inside this file.
We have to somehow use the machine instance we created earlier and make it work with Vue. To achieve it we have to import the machine instance and a dedicated vue xstate package called @xstate/vue. This library provides a reactive composable called useMachine. We will use it to operate on our machine within our Vue component.
<script setup lang="ts">
  import { useMachine } from "@xstate/vue";
  import { playerMachine } from "./../machines/playerMachine";

  const { state, send } = useMachine(playerMachine);
</script>
As we can see useMachine hook provides a state object, which holds all important information about the state and send function which is responsible for triggering transitions.
To trigger transition we have to do something like this:
send("PLAY");
This function call will trigger a transition from the current state. Depending on the current state this transition can lead to different states. The behavior is defined inside our machine instance.
To check if the machine is in certain state:
in script:
state.value.matches("playingBegin");
in template:
state.matches("playingBegin");
Since our demo app will only need triggering the transitions and checking the current state we can now create the UI for music player. Here is the template markdown:
<template>
  <div class="music-player">
    <div class="display">
      <div class="current-track">
        <div class="track-name">{{ currentTrack.name }}</div>
        <div class="track-artist">{{ currentTrack.artist }}</div>
      </div>
      <div class="state-icon">
        <IconPlay
          v-if="state.matches('idle') || state.matches('paused')"
          class="icon icon-play"
        ></IconPlay>
        <IconPause
          v-if="state.matches('playingBegin') || state.matches('playing')"
          class="icon icon-play"
        ></IconPause>
      </div>
      <div class="progress-bar">
        <div class="progress-bar-inner"></div>
      </div>
    </div>
    <div class="wheel">
      <button class="button-control menu">menu</button>
      <button class="button-control next" @click="nextTrack">
        <IconNext class="icon"></IconNext>
      </button>
      <button class="button-control prev" @click="rewindOrPrevious">
        <IconPrev class="icon"></IconPrev>
      </button>
      <button class="button-control playpause" @click="togglePlayPause">
        <IconPlay class="icon icon-play"></IconPlay>
        <IconPause class="icon"></IconPause>
      </button>
      <div class="wheel-inner"></div>
    </div>
  </div>
</template>
As mentioned before, this article is not about CSS so I won't cover this topic extensively but if you are interested you can check out the source code (link in the conclusion section). Let's focus on the logic. The interface consists of the following elements:
- display (not clickable) which presents information about the current track title, author, length and play/pause state
- wheel with 4 buttons (menu, previous track / rewind track, next track, play/pause)
To make it all work, we need some mock tracks: Let's create an array wrapped by a ref function with two random tracks:
<script setup lang="ts">
  import { computed, ref } from "vue";
  const tracks = ref([
    {
      name: "Ask The Mountains",
      artist: "Vangelis",
      length: 240
    },
    {
      name: "Colors of Love",
      artist: "Thomas Bergesen",
      length: 200
    }
  ]);
</script>
We have two tracks available, now we should create some variables to hold the information about the index of the current track and the current track itself.
<script setup lang="ts">
  import { computed, ref } from "vue";

  const currentTrackIndex = ref(0);

  const currentTrack = computed(() => {
    return tracks.value[currentTrackIndex.value];
  });
</script>
The track object holds information about its duration in seconds inside the length property. We can create a timer to keep the information about the current track progress in seconds. We will need it to automatically change the track if the current one finishes and to show the progress bar on display.
<script setup lang="ts">
  let progressInterval: ReturnType<typeof setInterval> | null = null;

  const currentTrackProgress = ref(0);

  const currentTrackProgressPercentage = computed(() => {
    return `${(currentTrackProgress.value / currentTrack.value.length) * 100}%`;
  });

  function startOrContinueProgressTimer() {
    progressInterval = setInterval(() => {
      checkForTrackEnd();
      currentTrackProgress.value += 1;
    }, 1000);
  }
</script>
Let's discuss what we have done here. We created an reactive variable called currentTrackProgress which is responsible for holding information about current track progress and since we will use setInterval function to increment the timer, we have created progressInterval to hold the setInterval instance. currentTrackProgressPercentage is a computed value which calculates track progress percentage and returns it as percentage string. This value is used inside CSS to animate progress bar:
.progress-bar {
  width: 80%;
  height: 25px;
  border-top: 1px solid gainsboro;
  border-bottom: 1px solid gainsboro;
  .progress-bar-inner {
    background: #16a1ea;
    height: 100%;
    width: v-bind(currentTrackProgressPercentage);
  }
}
startOrContinueProgressTimer function sets the timer with interval of one second. On every call it increments the currentTrackProgress by one second and and calls a function checkForTrackEnd responsible for checking if the track has ended.
<script setup lang="ts">
  function checkForTrackEnd() {
    if (currentTrackProgress.value === currentTrack.value.length) {
      nextTrack();
    }
  }
</script>
Since we have our timer we will definitely need some logic to reset the timer.
<script setup lang="ts">
  function resetTimer() {
    currentTrackProgress.value = 0;
    progressInterval && clearInterval(progressInterval);
  }
</script>
And obviously we have to clear it also on component unmount:
<script setup lang="ts">
  onUnmounted(() => {
    progressInterval && clearInterval(progressInterval);
  });
</script>
Great! We have all we need for our timer logic. Now we can move to state part. Let's implement the function which is triggered on play/pause button click. Since this button does two things depending on the current state we need top level function:
<script setup lang="ts">
  function togglePlayPause() {
    if (state.value.matches("idle")) {
      playBeginTrack();
    } else if (state.value.matches("paused")) {
      playTrack();
    } else {
      send("PAUSE");
      progressInterval && clearInterval(progressInterval);
    }
  }
</script>
It checks the current state using state.value.matches function and calls individual methods like playBeginTrack, playTrack or directly triggering PAUSE transition. PlayingBegin is the state at the very beginning of the track when pressing the previous button will switch to the previous track instead of rewinding at the beginning of the current track.
Let's take a look at playBeginTrack function:
<script setup lang="ts">
  function playBeginTrack() {
    send("PLAY_BEGIN");

    startOrContinueProgressTimer();

    setTimeout(() => {
      send("PLAY");
    }, playBeginStateDuration);
  }
</script>
At the very start, it triggers the PLAY_BEGIN transition and starts the progress timer by calling startOrContinueProgressTimer(). The second parameter of setTimeout function holds information about after how many milliseconds the state should switch to the normal playing state (send("PLAY"). In our case its 5 seconds
const playBeginStateDuration = 5000;
Let's move to another function playTrack. It's just simplified version of playBeginTrack and with PLAY trigger:
<script setup lang="ts">
  function playTrack() {
    send("PLAY");
    startOrContinueProgressTimer();
  }
</script>
Next, let's create nextTrack function:
<script setup lang="ts">
  function nextTrack() {
    resetTimer();

    if (currentTrackIndex.value < tracks.value.length - 1) {
      currentTrackIndex.value++;
    } else {
      currentTrackIndex.value = 0;
    }

    startOrContinueProgressTimer();
  }
</script>
This function is called When we click on the "next track" button. Since we are about to change the track we have to reset the timer. If the next track is within the range of our tracks array we increment the currentTrackIndex, if not we are resetting the currentTrackIndex back to 0. After a track has changed we are starting the timer again.
Great, we have a logic for our second button! Let's move then to our final button which is "previous track / rewind" button. As play/pause button its behaviour depends on current state. Let's create top level function for checking the state:
<script setup lang="ts">
  function rewindOrPrevious() {
    if (state.value.matches("playingBegin")) {
      previousTrack();
    } else {
      rewindTrack();
    }
  }
</script>
If the track just started playing and its state is playingBegin clicking on the "rewind / previous" button should switch to the previous track:
<script setup lang="ts">
  resetTimer();

  if (currentTrackIndex.value > 0) {
    currentTrackIndex.value--;
  } else {
    currentTrackIndex.value = tracks.value.length - 1;
  }

  startOrContinueProgressTimer();
</script>
The logic is very similar to nextTrack function. First, we need to reset the timer as we are switching the track and next we are decrementing currentTrackIndex if it is within the range of the tracks array. Finally, we have to start the timer one more time.
Rewind track function looks like this:
<script setup lang="ts">
  function rewindTrack() {
    resetTimer();

    send("PLAY_BEGIN");

    startOrContinueProgressTimer();
  }
</script>
It resets the timer and triggers PLAY_BEGIN transition since we are starting the track from the beginning. And again we have to start the timer again.
Voila! The app is finished! We have complete logic for our 3 buttons!
Conclusion
With XState we can create complex state machines and easily manage the state making sure that only one state is active. It also validates the transitions between states. With help of the great extension, docs and additional visualizers, developing apps with XState is a great experience!
Check out the demo:
Demo
Check out the source code:
Source code